fork/rust-analyzer
git clone https://git.julia.blue/fork/rust-analyzer
427061da19
2022-06-20
files
| README.md | 13.5 KiB |
| architecture.md | 26.3 KiB |
| debugging.md | 3.6 KiB |
| guide.md | 31.4 KiB |
| lsp-extensions.md | 20.4 KiB |
| style.md | 30.7 KiB |
| syntax.md | 20.6 KiB |
Contributing Quick Start
rust-analyzer is an ordinary Rust project, which is organized as a Cargo workspace, builds on stable and doesn't depend on C libraries. So, just
$ cargo test
should be enough to get you started!
To learn more about how rust-analyzer works, see ./architecture.md. It also explains the high-level layout of the source code. Do skim through that document.
We also publish rustdoc docs to pages: https://rust-lang.github.io/rust-analyzer/ide/. Note though, that the internal documentation is very incomplete.
Various organizational and process issues are discussed in this document.
Getting in Touch
rust-analyzer is a part of the RLS-2.0 working group. Discussion happens in this Zulip stream:
https://rust-lang.zulipchat.com/#narrow/stream/185405-t-compiler.2Frust-analyzer
Issue Labels
- good-first-issue are good issues to get into the project.
- E-has-instructions issues have links to the code in question and tests.
- Broken Window are issues which are not necessarily critical by themselves, but which should be fixed ASAP regardless, to avoid accumulation of technical debt.
- E-easy, E-medium, E-hard, E-unknown, labels are estimates for how hard would be to write a fix. Each triaged issue should have one of these labels.
- S-actionable and S-unactionable specify if there are concrete steps to resolve or advance an issue. Roughly, actionable issues need only work to be fixed, while unactionable ones are blocked either on user feedback (providing a reproducible example), or on larger architectural work or decisions. This classification is descriptive, not prescriptive, and might be wrong: Any unactionable issue might have a simple fix that we missed. Each triaged issue should have one of these labels.
- fun is for cool, but probably hard stuff.
- Design is for moderate/large scale architecture discussion. Also a kind of fun. These issues should generally include a link to a Zulip discussion thread.
Code Style & Review Process
Do see ./style.md.
Cookbook
CI
We use GitHub Actions for CI.
Most of the things, including formatting, are checked by cargo test.
If cargo test passes locally, that's a good sign that CI will be green as well.
The only exception is that some long-running tests are skipped locally by default.
Use env RUN_SLOW_TESTS=1 cargo test to run the full suite.
We use bors to enforce the not rocket science rule.
Launching rust-analyzer
Debugging the language server can be tricky. LSP is rather chatty, so driving it from the command line is not really feasible, driving it via VS Code requires interacting with two processes.
For this reason, the best way to see how rust-analyzer works is to find a relevant test and execute it. VS Code & Emacs include an action for running a single test.
Launching a VS Code instance with a locally built language server is also possible. There's "Run Extension (Debug Build)" launch configuration for this in VS Code.
In general, I use one of the following workflows for fixing bugs and implementing features:
If the problem concerns only internal parts of rust-analyzer (i.e. I don't need to touch the rust-analyzer crate or TypeScript code), there is a unit-test for it.
So, I use Rust Analyzer: Run action in VS Code to run this single test, and then just do printf-driven development/debugging.
As a sanity check after I'm done, I use cargo xtask install --server and Reload Window action in VS Code to verify that the thing works as I expect.
If the problem concerns only the VS Code extension, I use Run Installed Extension launch configuration from launch.json.
Notably, this uses the usual rust-analyzer binary from PATH.
For this, it is important to have the following in your settings.json file:
{
"rust-analyzer.server.path" : "rust-analyzer"
}
After I am done with the fix, I use cargo xtask install --client to try the new extension for real.
If I need to fix something in the rust-analyzer crate, I feel sad because it's on the boundary between the two processes, and working there is slow.
I usually just cargo xtask install --server and poke changes from my live environment.
Note that this uses --release, which is usually faster overall, because loading stdlib into debug version of rust-analyzer takes a lot of time.
To speed things up, sometimes I open a temporary hello-world project which has "rust-analyzer.cargo.noSysroot": true in .code/settings.json.
This flag causes rust-analyzer to skip loading the sysroot, which greatly reduces the amount of things rust-analyzer needs to do, and makes printf's more useful.
Note that you should only use the eprint! family of macros for debugging: stdout is used for LSP communication, and print! would break it.
If I need to fix something simultaneously in the server and in the client, I feel even more sad. I don't have a specific workflow for this case.
Additionally, I use cargo run --release -p rust-analyzer -- analysis-stats path/to/some/rust/crate to run a batch analysis.
This is primarily useful for performance optimizations, or for bug minimization.
TypeScript Tests
If you change files under editors/code and would like to run the tests and linter, install npm and run:
cd editors/codenpm cinpm run lint
How to ...
- ... add an assist? #7535
- ... add a new protocol extension? #4569
- ... add a new configuration option? #7451
- ... add a new completion? #6964
- ... allow new syntax in the parser? #7338
Logging
Logging is done by both rust-analyzer and VS Code, so it might be tricky to figure out where logs go.
Inside rust-analyzer, we use the tracing crate for logging,
and tracing-subscriber for logging frontend.
By default, log goes to stderr, but the stderr itself is processed by VS Code.
--log-file <PATH> CLI argument allows logging to file.
Setting the RA_LOG_FILE=<PATH> environment variable will also log to file, it will also override --log-file.
To see stderr in the running VS Code instance, go to the "Output" tab of the panel and select rust-analyzer.
This shows eprintln! as well.
Note that stdout is used for the actual protocol, so println! will break things.
To log all communication between the server and the client, there are two choices:
- You can log on the server side, by running something like
env RA_LOG=lsp_server=debug code .
- You can log on the client side, by enabling
"rust-analyzer.trace.server": "verbose"workspace setting. These logs are shown in a separate tab in the output and could be used with LSP inspector. Kudos to @DJMcNab for setting this awesome infra up!
There are also several VS Code commands which might be of interest:
-
Rust Analyzer: Statusshows some memory-usage statistics. -
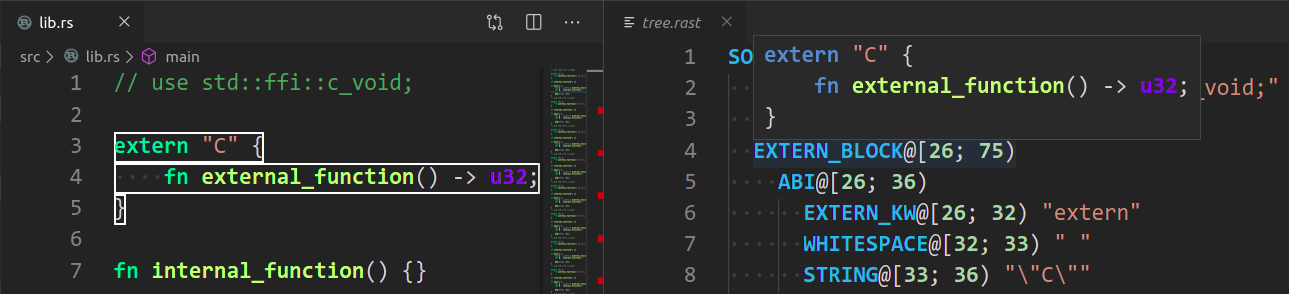
Rust Analyzer: Syntax Treeshows syntax tree of the current file/selection. -
Rust Analyzer: View Hirshows the HIR expressions within the function containing the cursor.You can hover over syntax nodes in the opened text file to see the appropriate rust code that it refers to and the rust editor will also highlight the proper text range.
If you trigger Go to Definition in the inspected Rust source file, the syntax tree read-only editor should scroll to and select the appropriate syntax node token.
Profiling
We have a built-in hierarchical profiler, you can enable it by using RA_PROFILE env-var:
RA_PROFILE=*             // dump everything
RA_PROFILE=foo|bar|baz   // enabled only selected entries
RA_PROFILE=*@3>10        // dump everything, up to depth 3, if it takes more than 10 ms
In particular, I have export RA_PROFILE='*>10' in my shell profile.
We also have a "counting" profiler which counts number of instances of popular structs.
It is enabled by RA_COUNT=1.
To measure time for from-scratch analysis, use something like this:
$ cargo run --release -p rust-analyzer -- analysis-stats ../chalk/
For measuring time of incremental analysis, use either of these:
$ cargo run --release -p rust-analyzer -- analysis-bench ../chalk/ --highlight ../chalk/chalk-engine/src/logic.rs
$ cargo run --release -p rust-analyzer -- analysis-bench ../chalk/ --complete ../chalk/chalk-engine/src/logic.rs:94:0
Look for fn benchmark_xxx tests for a quick way to reproduce performance problems.
Release Process
Release process is handled by release, dist and promote xtasks, release being the main one.
release assumes that you have checkouts of rust-analyzer, rust-analyzer.github.io, and rust-lang/rust in the same directory:
./rust-analyzer
./rust-analyzer.github.io
./rust-rust-analyzer  # Note the name!
Additionally, it assumes that the remote for rust-analyzer is called upstream (I use origin to point to my fork).
release calls the GitHub API calls to scrape pull request comments and categorize them in the changelog.
This step uses the curl and jq applications, which need to be available in PATH.
Finally, you need to obtain a GitHub personal access token and set the GITHUB_TOKEN environment variable.
Release steps:
- Set the
GITHUB_TOKENenvironment variable. - Inside rust-analyzer, run
cargo xtask release. This will:- checkout the
releasebranch - reset it to
upstream/nightly - push it to
upstream. This triggers GitHub Actions which:- runs
cargo xtask distto package binaries and VS Code extension - makes a GitHub release
- pushes VS Code extension to the marketplace
- runs
- call the GitHub API for PR details
- create a new changelog in
rust-analyzer.github.io
- checkout the
- While the release is in progress, fill in the changelog
- Commit & push the changelog
- Tweet
- Inside
rust-analyzer, runcargo xtask promote-- this will create a PR to rust-lang/rust updating rust-analyzer's submodule. Self-approve the PR.
If the GitHub Actions release fails because of a transient problem like a timeout, you can re-run the job from the Actions console.
If it fails because of something that needs to be fixed, remove the release tag (if needed), fix the problem, then start over.
Make sure to remove the new changelog post created when running cargo xtask release a second time.
We release "nightly" every night automatically and promote the latest nightly to "stable" manually, every week.
We don't do "patch" releases, unless something truly egregious comes up.
To do a patch release, cherry-pick the fix on top of the current release branch and push the branch.
There's no need to write a changelog for a patch release, it's OK to include the notes about the fix into the next weekly one.
Note: we tag releases by dates, releasing a patch release on the same day should work (by overwriting a tag), but I am not 100% sure.
Permissions
There are three sets of people with extra permissions:
- rust-analyzer GitHub organization admins (which include current t-compiler leads). Admins have full access to the org.
- review team in the organization.
Reviewers have
r+access to all of organization's repositories and publish rights on crates.io. They also have direct commit access, but all changes should via bors queue. It's ok to self-approve if you think you know what you are doing! bors should automatically sync the permissions. Feel free to request a review or assign any PR to a reviewer with the relevant expertise to bring the work to their attention. Don't feel pressured to review assigned PRs though. If you don't feel like reviewing for whatever reason, someone else will pick the review up! - triage team in the organization. This team can label and close issues.
Note that at the time being you need to be a member of the org yourself to view the links.